What’s this?
This is like a “wiki” of sorts where I write down and document stuff I’ve found helpful from across the internet. The primary purpose of this is that I don’t have to go a searching for the same things again if ever needed, like bookmarks, but a bit overkill. I will try to keep things in a way that other can follow along, but no promises.
NixOS on Raspberry Pi 4 over USB
TL;DR; The officially supported SD image↗ available in Hydra only works when booting off of SD cards, due to some bug in U-Boot. Here’s a workaround to get the Pi to boot NixOS from a USB drive or an SSD.
Requirements
- A Raspberry Pi 4 (duh!)
- An SD card (it will be our installer)
- A USB Drive (NixOS will be installed to it)
Preparing the Pi to boot from USB
Write the misc utility images -> Bootloader (Pi 4 family) -> USB Boot image onto an SD card using Raspberry Pi Imager (pkgs.rpi-imager) and boot the Pi with it. Once booted, wait for 10-15 seconds and turn off the Pi. This will update the Pi’s firmware to prefer booting from USB.
Preparing the installer SD card (installer)
- Download a recent version of the aarch64 SD card image from Hydra↗
- The image will be compressed with ZSTD, so it needs to be decompressed before being written to the SD card
zstd --decompress nixos-sd-image-24.11preblah.blahblah-aarch64-linux.img.zst - Write the decompressed image to the SD card (we’ll call it /dev/mmcblkN from now on)
dd if=nixos-sd-image-24.11preblah.blahblah-aarch64-linux.img of=/dev/mmcblkN
Preparing the USB drive
Disk Layout
Note
We’re make it work just like a normal UEFI machine so the partitions will resemble that
- Partitioning the USB device (we’ll call it /dev/sdN)
- An EFI partition (FAT32) of reasonable size (will be mounted on /boot and the kernel/initrd will go in there)
- A partition for / (ext4, btrfs or whatever’s your choice) I’m going with a 1GiB EFI partition and the remaining space as a single btrfs partition
- Format the partitions
  mkfs.vfat -F32 -n NIXOS_BOOT /dev/sdN1
  mkfs.btrfs -L NIXOS_ROOT /dev/sdN2
Files
- Download the latest release of the Raspberry Pi 4 UEFI firmware ↗
- Extract the contents onto the EFI partition on the USB disk
  mkdir /tmp/efi
  mount /dev/sdN1 /tmp/efi
  unzip RPi4_UEFI_Firmware_v1.37.zip -d /tmp/efi/
  umount /tmp/efi
Optional: Download the Raspberry Pi device tree overlays
Note
This is only required if you need a working GPIO, to use any HATs etc. I need it because I power the Pi using the PoE+ HAT and the fans on the HAT doesn’t work without this.
- Download a recent version of the Raspberry Pi OS↗. The 64-bit Lite version should be enough.
- Extract the overlays
  losetup /dev/loop0 2024-03-15-raspios-bookworm-arm64-lite.img
  partx -u /dev/loop0
  mkdir /tmp/firmware
  mount /dev/loop0p1 /tmp/firmware
  mkdir /tmp/efi
  mount /dev/sdN1 /tmp/efi
  mkdir /tmp/efi/overlays
  cp /tmp/firmware/overlays/* /tmp/efi/overlays/
  umount /tmp/efi
Installing
Use the installed SD card prepared above to boot the Pi. (Don’t plug in the USB drive yet, otherwise the Pi will try to boot from it).
Once it’s successfully booted and shows the TTY, plug in the USB drive. At this point the USB drive can be mounted to /mnt or anywhere and NixOS can be installed to it with the nixos-generate-config and nixos-install scripts.
If any HATs are to be used or if the GPIO is needed, make sure to change boot.kernelPackages to pkgs.linuxPackages_rpi4 in the configuration.nix before doing nixos-install.
Post Install
Once the installation is done, power off the Pi and remove the SD card. Now turning it on with the USB drive plugged in will show a screen with a big Raspberry Pi logo. Press Esc to go to the UEFI Firmware settings.
Two things need to be changed here.
- There’s a 3GB limit on the RAM due to a hardware bug in the Broadcom SoC. A Kernel version of 5.8 or later has a workaround for this so we can turn off the limit.
Go to
Device Manager→Raspberry Pi Configuration→Advanced Settingsin the UEFI settings and disable the 3GB limit. - (Optional: only required if HATs/GPIO are used) In the same
Advanced Settingspage, change the second item fromACPItoACPI + Device Tree
Hit F10 to save and use Esc to go back to the main page. Use the Continue option to resume booting. It will ask to reset, press Y
If everything went well, it should now boot into Freshly installed NixOS, booted from a USB device on the Pi 4 :)
Firefox + Nix
I am a Firefox user. The reason I started using Firefox was that it pretty much worked out of the box on Wayland since day one. Chromium based browsers taking over the web is also a good reason to start using Firefox now.
The only problem is that it comes filled with a bunch of bloat that I don’t really need. Sponsored links and the recommended content on the default home page are all examples of this.
But luckily, Firefox makes it possible to disable these relatively easily, using one or both of the two files - user.js and policies.json
user.js
A user.js is a file that exists in the profile directory of firefox, $HOME/.mozilla/firefox/<profile name>. It contains calls to a function user_pref(key, value) where key is any of the firefox settings and value is the value for that setting.
Example:
user_pref("app.shield.optoutstudies.enabled", false);
user_pref("privacy.donottrackheader.enabled", true);
user_pref("privacy.firstparty.isolate", true);
user_pref("privacy.globalprivacycontrol.enabled", true);
The profile name is usually a random string followed by .default. The easiest way to find this is to go to the about:profiles page in firefox and clicking the Open Directory button for Root Directory. This should open the profiles directory in a file browser.
By default, the user.js file does not exist so it needs to be created. Once created, lines like the above can be added to it to change “almost” any settings in firefox.
What is the key in user.js?
All possible keys can be found in the about:config page of firefox. Typing anything into the search bar in this page will start showing all the options that match. The values can be changed from this page and it would change the curresponding firefox setting.
The hard part is finding which options here currespond to which option in firefox settings.
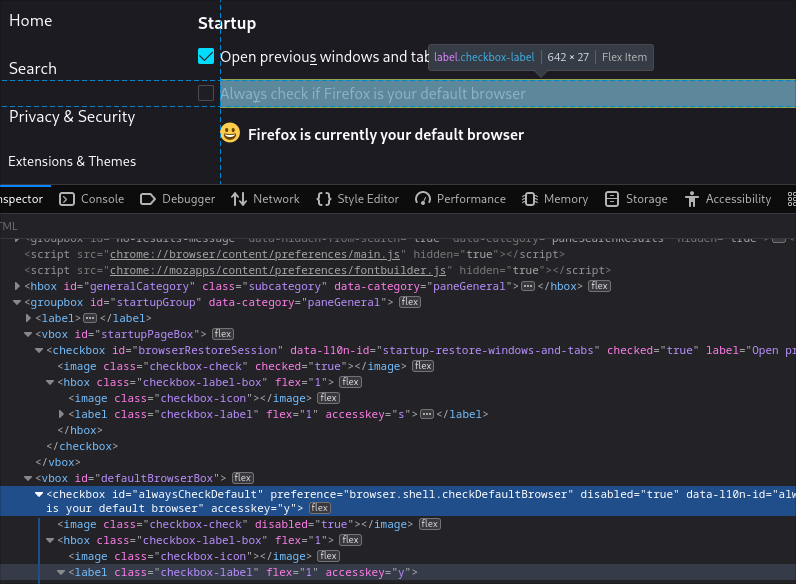
Using inspect element in the firefox settings page, about:preferences, use Ctrl+Shift+C to enable the hover mode and hovering over any thing here should show the curresponding html element in the inspect window.
In the highlighed html element, the preference html attribute points to he curresponding option in about config.

In the screenshot, when hovered over the Always check if Firefox is your default browser setting, the inspect window highlights the checkbox element with the preference browser.shell.checkDefaultBrowser. Any change to that preference in about:config will reflect in the settings page.

Now, adding a line
user_pref("browser.shell.checkDefaultBrowser", false)
to $HOME/.mozilla/firefox/<profile>/user.js and restarting firefox will stop Firefox from checking if it’s the default browser.
Now a user.js with all the settigs that need to be changed can be created and kept around, maybe in a git repo along with all the other dotfiles, and any time Firefox is reinstalled or installed on a new machine, this file can be copied over to the new profiles directory and all these settings can be applied in a single step. No need to go poking around the settings page everytime.
References:
policies.json
policies.json is a more stricter alternative to configuring Firefox. It is a feature meant for Firefox for Enterprise which is meant for an organization can enforce the behavior of Firefox.
This can be used to enable or disable parts of the browser, install extensions automatically, prevent user from changing settings etc.
To use this, created a file called policies.json inside a directory called distribution in the directory where firefox is intalled. On a Debian machine, this is /usr/lib/firefox/distribution. It may vary depending on the OS and installation methods.
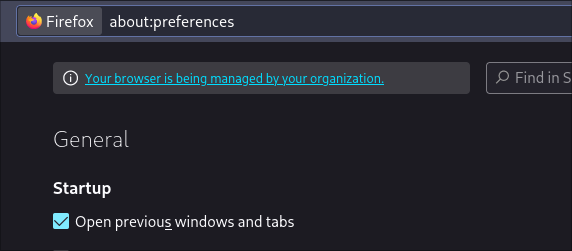
The list of available policies are available here. Although there might be some policies that are version specific, most of them should just work. Once the relevant policies are added to policies.json and firefox is restarted, going to about:policies should list all the active policies. This will also add a Your browser is being managed by your organization. message to the top of the settings page.

If there are errors with any of the policies, or if some policy is not supported in with the version of firefox, it will be shown under the Errors section in about:policies page.
What does Nix have anything to do with this?
The firefox package provided in nixpkgs supports overrides for policies. pkgs.firefox.override { extraPolicies = { ... } } can be used when installing firefox to set any of the supported policies.
The NixOS module for Firefox, programs.firefox has options to control these policies. Same is the case with Home Manager. The options program.firefox.policies or programs.firefox.profiles.<name>.settings can be used to set the policies and user.js configs respectively.
With this, instead of keeping track of 2 files, policies.json and user.js, in some dotfiles repository and remembering to keep them up to date everytime something is changes, it can be tracked along with the rest of the NixOS configuration. Yay!
Adhoc development environments with Nix
I’ve recently started exploring Python and Haskell. When working with projects in these, I need to have a bunch of dependencies installed. For example, with Python, I’d need a version of the Python interpreter itself, Pip of Pipenv or something similar for installing external modules, maybe a language server like pyright etc.
But I don’t need these installed and available all the time, polluting my $PATH
That’s where Nix comes in.
Nix has a way to define development shells and activate them only when needed. When activated, it will update variables like $PATH and make any extra dependencies available. Once done working on something, it can be deactivated.
For example, below is a simple dev shell which installs go 1.20.
{
  inputs = {
    nixpkgs.url = "github:NixOS/nixpkgs/nixpkgs-unstable";
  };

  outputs = { self, nixpkgs, }:
  let
    system = "x86_64-linux";
    pkgs = import nixpkgs {
      inherit system;
    };
  in
  {
    devShells.${system}.default = pkgs.mkShell {
      packages = [
        pkgs.go_1_20
      ];
    };
  };
}
After creating a file called flake.nix in the project directory, it can be activated with the nix develop command. And once done, the shell can be closed with exit or Ctrl+d.
The problem with this is that, it starts a new bash shell with a really generic prompt. So any customizations made in .bashrc or .zshrc etc. gets lost.
Direnv to the rescue
Direnv is a tool that, once hooked up with the shell, will execute a set of commands mentioned in a per project .envrc file. It will execute these commands automatically when cd’d into the directory and the changes will be reverted when cd’ing out.
Direnv has something they call the stdlib, which is a set of sane defaults in the form of functions that can be put into the envrc. One such function is the use_flake function.
By creating a file called .envrc in the project directory with the content
use_flake
direnv will automatically append the environment created by the devShell defined in flake.nix to the existing shell env, without starting a new shell or losing any of the customizations from .bashrc or .zshrc